Troubleshooting multi-threading problems related to Android’s onResume()

This post is a continuation of a previous post I wrote about best practices for using onResume(). I found a particularly testy bug that caused me 2 hours of pain time to track down. The tricky part was it would only show up when there was no debugger attached. Right away this told me it was a threading problem. I suspected that the debugger slowed things down just enough that all the threads could complete in the expected order, but not the actual order that occurred when running the device in stand-alone mode.

The test case. This is actually a very common workflow, and perhaps so common that we just don’t think about it much:

  • Cold start the application without a debugger attached. By cold start I mean that the app was in a completely stopped, non-cached state.
  • Minimize the app like you are going to do some other task.
  • Open the app again to ensure that onResume() gets called.

Now, fortunately I already had good error handling built-in. I kept seeing in logcat and a toast message that a java.lang.NullPointerException was occuring. What happened next was troubleshooting a multi-threaded app without the benefit of a debugger. Not fun. I knew I had to do it because of the visibility of the use case. I couldn’t let this one go.

How to narrow down the problem. The pattern I used to hunt down the bug was to wrap each line of code or code block with Log messages like this.

Log.d("Test","Test1");
setLocationListener(true, true);
Log.d("Test","Test2");

Then I used the following methodology starting inside the method were the NullPointerException was occurring. I did this step-by-step, app rebuild by app rebuild, through the next 250 lines of related code:

  1. Click debug in Eclipse to build the new version of the app that included any new logging code as shown above, and load it on the device.
  2. Wait until the application was running, then shutdown the debug session through Eclipse.
  3. Restart the app on device. Note: debugger was shutdown so it wouldn’t re-attach.
  4. Watch the messages in Logcat.
  5. If I saw one message , such as Test1, followed by the NullPointerException with no test message after it, then I knew it was the offending code block, method or property. If it was a method, then I followed the same pattern through the individual lines of code inside that method. This looked very much like you would do with step-thru debugging, except this was done manually. Ugh.

What caused the problem? As time went on, and I was surprised that I had to keep going and going deeper in the code, I became very curious.  It turned out to be a multi-threading bug in a third party library that wasn’t fully initialized even though it had a method to check if initialization was complete. The boolean state property was plainly wrong. This one portion of the library wasn’t taken into account when declaring initialization was complete. And I was trying to access a property that wasn’t initialized. Oops…now that’s a bug.

The workaround? To work around the problem  I simply wrapped the offending property in a try/catch block. Then using the pattern I described in the previous blog post I was able to keep running verification checks until this property was either correctly initialized, or fail after a certain number of attempts. This isn’t 100% ideal, yet it let me keep going forward with the project until the vendor fixes the bug.

Lessons Learned. I’ve done kernel level debugging on Windows applications, but I really didn’t feel like learning how to do it with one or multiple Android devices. I was determined to try and narrow down the bug using the rather primitive tools at hand. The good news is it only took two hours. For me, it reaffirmed my own practice of implementing good error handling because I knew immediately where to start looking. I had multiple libraries and several thousand lines of code to work with. And, as I’ve seen before there are some bugs in Android that simply fail with little meaningful information. By doubling down and taking it step-by-step I was able to mitigate a very visible bug.
Simple Native JavaScript Classes – So simple a caveman could do it.

Among the many things I severely dislike about JavaScript is working with applications that have oodles of global variables, multiple .js libraries and dozens of loosely organized, individual functions. This is a very common pattern (or perhaps an anti-pattern). But it’s a terrible way to code for medium to large projects, especially where you have to share your code. Here’s a highly simplified example:


var someNumber = 2; //Global variable

function add(number){
    return someNumber + number;
};
alert(add(4)); //displays "6"

It’s unfortunate that this pattern is reinforced in authoritative books, blogs and articles. It’s completely pervasive in the majority of examples you see on the web. The downside is modifying, testing and troubleshooting this pattern can be an absolute nightmare. I compare it to building a fragile, multi-level house of cards: one wrong bump and it all falls down.

There is a better way!

So, I offer an easy-to-implement solution: where possible place your functions and properties in Class-like objects and all will be so much better. It’s not quite what you get with strongly-typed object oriented languages like C# or Java, but it works. Besides, if you use this pattern in your project then cats and dogs will live peacefully side-by-side and the universe will be in balance. The best news: this works perfectly fine with plain old JavaScript (POJO). And, if you are using something like jQuery use can use some version of Classes with those too, and I highly recommend it.

Here’s the fundamental pattern of a JavaScript Class:

function Add(){};
var someMath = new Add();

That’s very easy…right?? The advantages are many and include the following:

  • You get a powerful framework for logically grouping functionality. This lends to scalability and ultimately stability in your projects.
  • You can easily extend this pattern using prototypal inheritance.
  • You can take advantage of encapsulation.
  • You can implement inheritance and polymorphism.
Now let’s put this pattern to use. I’m providing two examples here. There are several other syntactical ways of doing this, but for brevity I’m sticking with two. The first example uses a very basic Object to implement namespace-like behavior. I say namespace-like because it’s not a true namespace like in C# or Java. The second example uses the built-in windows Object as a way of passing the namespace information. Click here to download a sample app that demonstrates these concepts.

POJO Class Pattern using Object Namespaces

Here’s an expanded example of the pattern with two levels of namespace separation using a standard Object :

if (!com) var com = {};    //1st level namespace
if (!com.ag) com.ag = {};  //2nd level namespace
if (!com.ag.Add) {
    com.ag.Add = function (value) {
        /// <summary>Demonstrates the plain old JavaScript pattern for classes.</summary>
        /// <param name="value" type="Number">Any number.</param>

        this.getValue = function () {
            /// <summary>Returns the property passed to the constructor.</summary>
            /// <returns type="Number">A number that was passed to the constructor.</returns>
            return value;
        },

        this.add = function (number) {
            /// <summary>This method adds value property + number</summary>
            /// <param name="number" type="Number">The number we want to add.</param>
            /// <returns type="Number">The number passed to the contructor plus this number</returns>
            return value + number;
        }

        //For Visual Studio intellisense cues
        com.__namespace = true;
        com.ag.__namespace = true;
        com.ag.Add.__class = true;
    }
}

And, here’s how to use this class:

var test = new com.ag.Add(2);
alert(test.add(4)); //displays "6"

POJO  Class Pattern using window[] Namespaces

Here is a slightly different version of the pattern that uses the window object, the results are the same:

if (!window["NS"]) window["NS"] = {};

window["NS"].Add = function (value) {
    /// <summary>This class uses addition</summary>
    /// <param name="value" type="Number">The number we pass to the contructor.</param>

    this.getValue = function () {
        /// <summary>Returns the private property called value.</summary>
        /// <returns type="Number">The number passed to the contructor.</returns>
        return value;
    },

            this.add = function (number) {
                /// <summary>This method adds value + number</summary>
                /// <param name="number" type="Number">The value we want to add.</param>
                /// <returns type="Number">The number passed to the contructor plus this number</returns>
                return value + number;
            }

    //For Visual Studio intellisense cues
    window["NS"].__namespace = true;
    window["NS"].Add.__class = true;
}

Here’s an example of how to use this class:

var test = new NS.Add(2);
alert(test.add(4)); //displays "6"

You are probably wondering about the funky xml comments. That’s for Visual Studio 2010’s built-in intellisense. I think but I’m not 100% certain that these work with Visual Studio Express as well. If you know for sure then please drop a comment. Notepad++ and other tools are okay for small projects but you can thank me later when you use this Class pattern along with built-in intellisense for any project that involves more than a dozen or so functions. And that’s not all – you can also see intellisense across different .js libraries. It’s all about productivity and ease-of-debugging. And, everyone will thank you when they have to re-use your code.

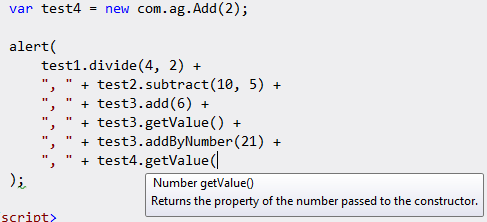
I’ve also attached a screenshot below to show you what the Visual Studio intellisense looks like. Also note in this example, the physical file, Add.js, in in the directory /scripts/com/ag/Add.js and I’m writing code in index.html which is at the root directory. How cool is that?!

 References

Sample application that demonstrates the Class concepts

Douglas Crockford’s [awesome] JavaScript Blog

Visual Studio JavaScript Intellisense Revisited

Creating Advanced [JavaScript] Web Applications with Object Oriented Techniques

Object Oriented Programming in JavaScript

Write Object Oriented JavaScript Part 1

The Format for JavaScript Doc Comments (Visual Studio)

Regular Expressions with Flex and ActionScript

Adobe has some great regex-based methods that can help you easily parse strings. If you aren’t familiar with regular expressions, they are basically very powerful, short-hand algorithms that are specifically designed to find patterns in strings. There are many people that hate regex’s but don’t let that deter you. They are very powerful and can save you a ton of time. And, even better is ActionScript lets you use either strings or regexes.

They are most commonly used to check form inputs for illegal characters, verifying correct formatting or for parsing complex strings. Here is an example usage pattern that looks for the end of a line:

var content:String = “Read this sentence.\r\n This is the second sentence.”;
var pattern:RegExp = /\r\n/;
trace(content.match(pattern));
var index:int = content.search(pattern);
trace(content.substr(index));

Here are some of the string methods you should become familiar with:

  • match() – uses either a regex or a string for the search pattern and returns an array of matching substrings.
  • replace() – does exactly what is says. It’s great for cleaning up inputs. Use cases include things such as removing inappropriate language.
  • search() – uses either a regex or a string for the search pattern and returns the first index of the substring that is located, or returns a -1. This is a great method to use for parsing strings.

Once you’ve found a match, so to speak, then you can use other string methods to parse the string:

  • slice() –  which slices out a section of the string for you given a start and ending index.
  • substr() – cuts out a substring based on a start index and length.
  • substring() – similar to substr() but the second parameter is the position of the character at the end of the substring.

A few helpful references: