10 Tips for New Web Developers

If you are just getting started building web applications, these 10 tips are fundamental to learning how to build really great apps and to being successful in your new career.

1. Build at least one application on your own that wasn’t required in class and include a complex user interface component, such as a widget, and database access.

2. Understand how to use debuggers, browser debugging tools and breakpoints on IE, Chrome, Firefox and Safari for desktop and mobile.

3. Practice building your own prototype apps using the most common JavaScript libraries. The best way to learn is to roll up your sleeves and work on it. Get your curious on!

4. Understand how to use a code repository. Try posting a few of your prototypes on github.

5. Read books written by the experts. When done read some more. Learn by example.

6. Participate by asking and answering questions in industry forums such as  Stack Exchange. You’ll gain more confidence as time goes on.

7. Understand how basic coding patterns such as loops and HTTP request/response can affect website and mobile performance.

8. Learn the difference between client and server-based code.

9. Practice problem solving by testing your prototype apps against the different major browsers. You will really learn what works and what doesn’t work. In most problem solving there is no exact answer, but knowing how to come up with potential solutions will save the day.

10. Research a problem first, then ask questions. Your colleagues that have been coding for a long time know when a question wasn’t well researched beforehand. You will learn best by trying to solve it. It can be like a puzzle and you have to figure out how the pieces fit together.

11. Yep, I know I said 10 tips, so this is a bonus. Read and learn about user interface design, and if possible work with an experienced UX engineer/designer. UX, or user interface design, makes the difference between an okay app and an excellent app.
Debugging HTTP Requests on Native Android Apps

If your native android app uses HTTP requests, then there is currently nothing built into Logcat that let’s you see HTTP connections. Just to clarify, you can see HTTP requests in Logcat when they come from the Android browser, but not when they come from a native app.

Like many of my blog posts, I’ve done a fair amount of searching before I try to re-invent the wheel. And, on this topic, I scoured the Logcat documentation, and I looked around for several days and found nada. Zip. Zero. The bottom line is I need a full-proof, gimmick free way to test HTTP connections that will work all the time.

Here’s the Solution. Load wireshark protocol analyzer on your machine, turn it on, and then run your app in the Android emulator. There are other protocol analyzers you can use, such as Charles, but I prefer wireshark.  If you aren’t a developer and you don’t have access to the source code, then you are probably out of luck.

Why does this work? This works every time and all the time because the emulator runs on your machine, and the protocol analyzer picks up any HTTP request coming from the emulator (or anywhere else on your machine for that matter). Period.

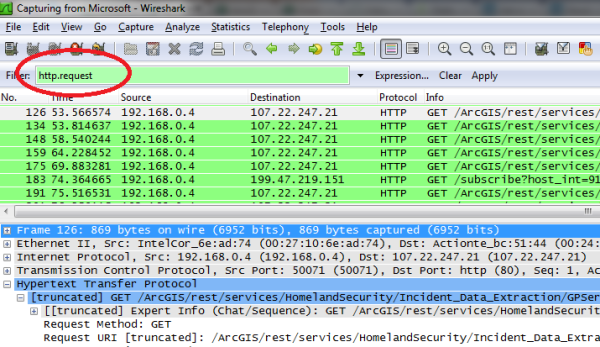
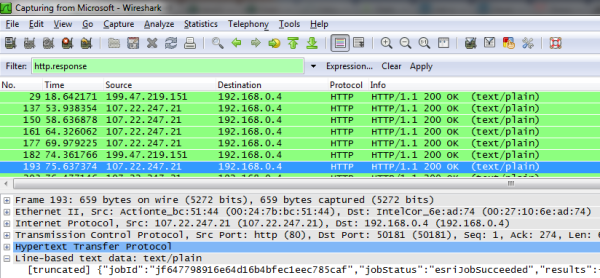
Tip #1. If you haven’t used wireshark before then when you turn it on, in the filter field apply either http.request or http.response to cut down on the noise you’ll pick up.

Tip #2. Yep, you can also use this methodology to debug apps running in the Android browser of the Emulator. Also, as a bonus, if you are using this methodology to debug browser apps, you can set the proxy settings on your phone (or browser) and point them to the IP address of the machine running Charles or Fiddler, for example. Note, this only works if your phone and proxy are on the same network, and if your wireless router also acts as a LAN router to allow HTTP connections between machines. If you don’t know how to set proxy settings for your browser just do a search on “proxy android.”

Here’s an example with http.request. The services shown in the image are publicly available:

Here’s an example with http.response:

Using ActionScript Tokenized Asynchronous HTTP Requests

My recent Antarctica Flex/ActionScript app had a requirement for tokenized asynchronous requests. That way I could use a centralized HTTP controller through which every outbound request was submitted. By attaching a “token” to each request, I could properly manage the response payload for the dozen’ish different processes that were going on. In other words, you attach a unique identifier to the outbound request. When the server sends back its response to the client application, this unique identifier is passed along in the payload. Quite cool, right?!

I’ve used this technique in heavy-duty, server-side applications before but only a few times in a web client. In practice it works brilliantly and it allowed me to easily organize the HTTP responses from many different types of requests and keep them all straight. At the heart of controller was this pseudo-code. If you haven’t done this before, there are just a few tricks to make it work right. I’ve included all the code to make your life easier. The token variable is a String that you create and then pass to the AsynchResponder.

                               
_http = new HTTPService();
_http.concurrency = "multiple";
_http.requestTimeout = 20;
_http.method = "POST";

var asyncToken:AsyncToken = _http.send( paramsObject );  
                                     
//you pass the token variable in as a String
var token:String = "someValue";
var responder:AsyncResponder = new AsyncResponder(resultHandler,faultHandler,token);
asyncToken.addResponder(responder);

Elsewhere in the app, the other classes that used the controller received the response payload via the event bus and then filtered the response by the tokens using a switch/case statement. AppEvent is my custom event bus that would broadcast the payload to the entire application via an Event. This allowed me to fully decouple the http controller from being directly wired into my other classes. It made the app very flexible in that action would only be taken when the response came back. If you want a few more details about this architecture, then check out my blog post on it. Here’s the HTTP response handler pseudo-code that is inside the controller.

Just a note, the HTTPData Class is a custom object I wrote to manage the response data. You could manage the data anyway you like. This is just one example of how to do it.

private function resultHandler(result:Object, token:Object = null):void
{	
	var httpData:HTTPData = new HTTPData();
	httpData.result = result.result;
	httpData.token = token; 
	AppEvent.dispatch(AppEvent.HTTP_RESULT,httpData);
}

And, here’s the response handler that’s inside one of the applications pages (views) that recieve the payload via my event bus:

AppEvent.addListener(AppEvent.HTTP_RESULT,httpResultHandler);

/**
 * Handles setting up many of the user variables based on tokenized,
 * asynchronous HTTP requests.
 * @param event AppEvent from HTTP request.
 */
private function httpResultHandler(event:AppEvent):void
{
    var json:String = event.data.result as String;	
    
    //route the tokens through a switch/case statement
    switch(event.data.token)
    {
         case "getallgpspoints":
              parseGPSPoints2(json);
              break;
    }
}

You can download the entire controller example here. If you use it for your own work, you’ll have to comment out anything you don’t need like some of the import statements and the custom events. Have fun!