How to upgrade your AIR SDK in FlashBuilder 4.6

This post walks through the steps for upgrading your AIR SDK.  There are just a few tricks and I spell them out here since this isn’t a one-click, plug-in-play operation. As of this writing, AIR 3.3 is the latest version, whereas FlashBuilder 4.6 came with v3.1 installed.

Why upgrade? In my case I had two reasons. First, I’d heard from a co-worker that AIR v3.3 compiled significantly faster. And, second I ran into a few flaky bugs and I wanted to test my builds using the latest SDK version.

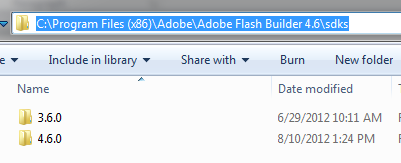
1. Make a copy of the Flex SDK directory and place it in the same default sdk directory. On windows this is C:\Program Files (x86)\Adobe\Adobe Flash Builder 4.6\sdks. Rename the new directory you just created to something like “4.6A3.3”.

2. Download latest AIR SDK (zip) file from Adobe. Yep, even though Adobe open sourced Flex, they still produce AIR and the FlashPlayer runtime: https://www.adobe.com/devnet/air/air-sdk-download.html.

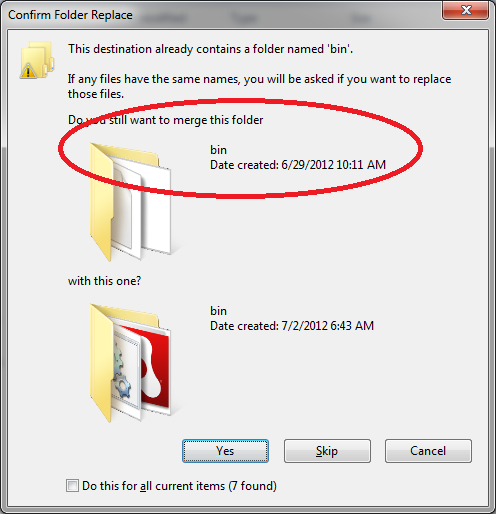
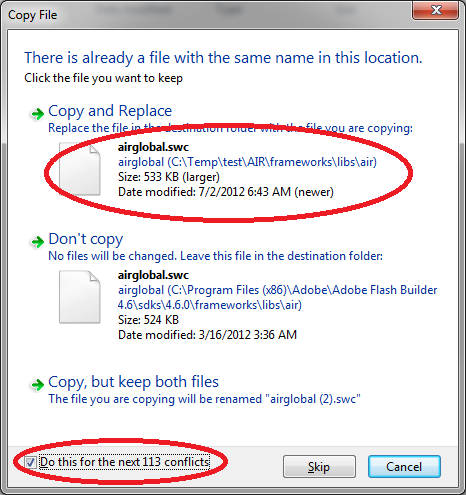
3. Merge the contents from the AIR SDK zip file into the new copy of the Flex SDK directory. There will be some files that you have to overwrite in order to get the latest version.

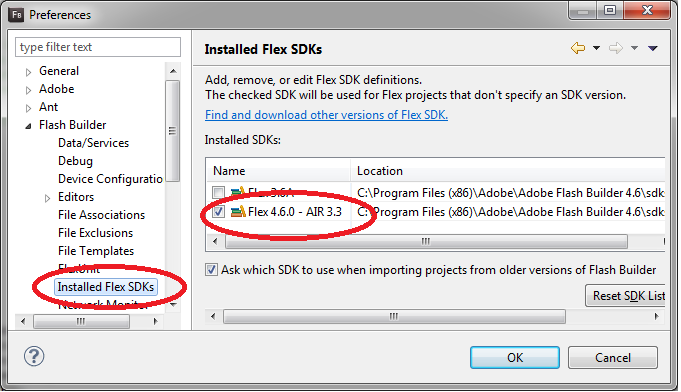
4. Instruct FlashBuilder to use the new SDK by going to Window > Preferences > Flash Builder > Installed Flex SDKs, and then click “Add”. If you want to keep track of the different AIR versions related to Flex then make up a new naming convention for the SDK such as “Flex 4.6 – AIR 3.3”.

5. For existing projects which are using the older versions of AIR, such as Flex mobile projects, you’ll need to manually update the app.xml file to use the correct SDK version number in the namespace (xmlns). This file can be found in your FlashBuilder Project using the Package Explorer. If you don’t make this change you’ll get a compiler error. Your app.xml namespace should look like this. Note that when you create a new mobile project it should automatically be created with the correct xmlns settings.

<?xml version="1.0" encoding="utf-8" standalone="no"?>
<application xmlns="https://ns.adobe.com/air/application/3.3">

<!-- Adobe AIR Application Descriptor File Template.

	Specifies parameters for identifying, installing, and launching AIR applications.

	xmlns - The Adobe AIR namespace: https://ns.adobe.com/air/application/3.3
			The last segment of the namespace specifies the version
			of the AIR runtime required for this application to run.

	minimumPatchLevel - The minimum patch level of the AIR runtime required to run
			the application. Optional.
-->

Here’s an example of the error you’ll get if you don’t do this. You’ll see something like “Namespace 3.1 in the application descriptor file should be equal or higher than the minimum version 3.3 required by the Flex SDK.”

References:
Adobe Doc – Overlay the AIR SDK with the Flex SDK

Debugging Flex-AIR apps on iPhone and iPad

Debugging iPad or iPhone apps that you built with FlashBuilder has a number of extra steps that you don’t need when developing with Android. This is especially true if you use Windows as your primary operating system. The good news is that once you’ve done it once or twice it should be fairly straight forward. So here are a few hints to get you going.

Step 0. If you are building on Windows make sure to install the latest version of iTunes. Then check that your iPad or iPhone can be synched with iTunes. If you use a mac you’ve most likely already done this step (in your sleep a hundred times).

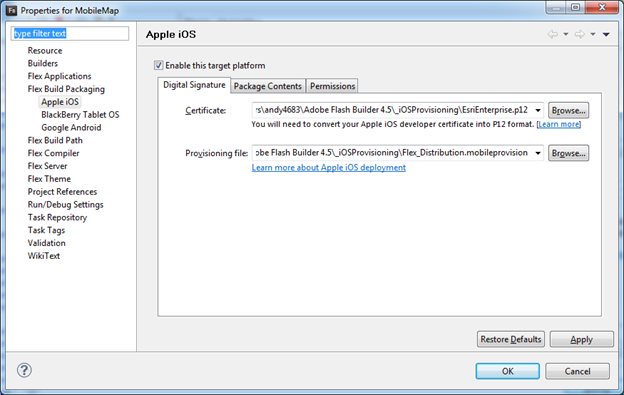
Step 1. Make sure you have a certificate and provisioning file. This must be configured under FlashBuilder Project > Properties > Flex Build Packaging. IMPORTANT: If the certificate and provisioning file are not set up or are not valid you will not be able to compile your project. If you don’t know what this is or how to do it, additional info can be found here in a great blog post by Holly Schinsky (@devgirlFL).

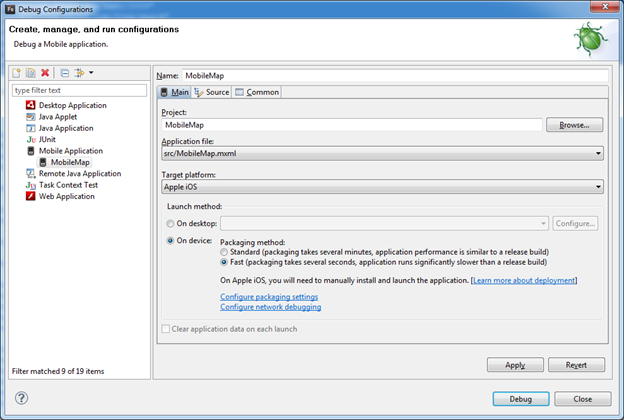
Step 2. Set up a Debug Configuration. If you don’t know where that is, select the pulldown next to the bug icon on the FlashBuilder toolbar and then choose Debug Configuration, or go to Run > Debug Configurations. Choose Apple iOS as your Target Platform. Be sure to select the On Device Packaging Method > Fast! If you don’t do this and you choose the Standard option it will take five or more minutes to compile the build each time you hit debug, and that can become a huge time waster really fast. One advantage of using the Standard option is it will perform more like the final release build. In comparison, the Fast version won’t be as performant. So, for the vast majority of your debugging you should probably use Fast, and when you want to test a final build then you might want to choose Standard. When you are ready select the Debug button.

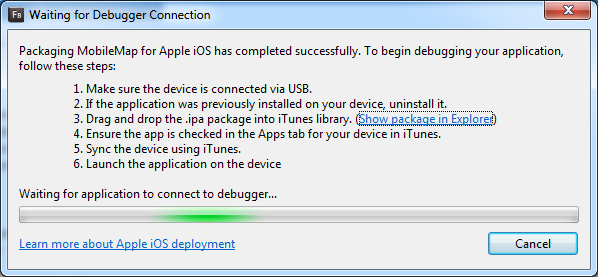
Step 3.  You will then see a popup window with six important instructions. Once you have completed Steps one and two, select the Show package in Explorer link.

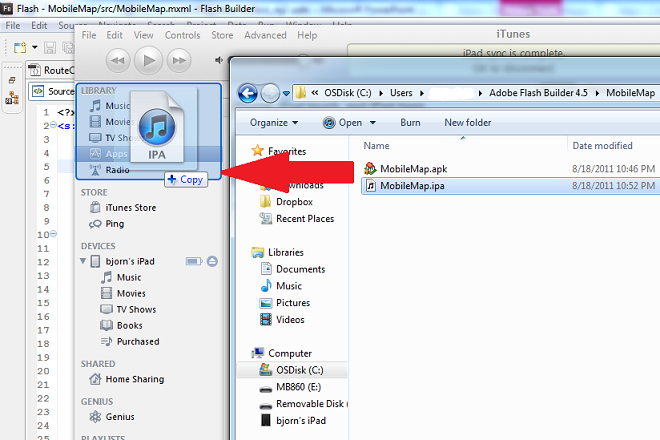
Step 4. Drag the .ipa file from your file browser window into the iTunes Library > Apps area.

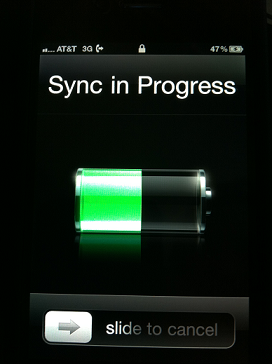
Step 5. Select the Sync button on the bottom right hand corner of iTunes. You should see Sync In Progress screen on your device. Let the operation complete. When it’s finished you should see a message in the message box at the top of iTunes that says the sync was successful. If there was an error it will also show up in the message box at the top of the iTumes application window.

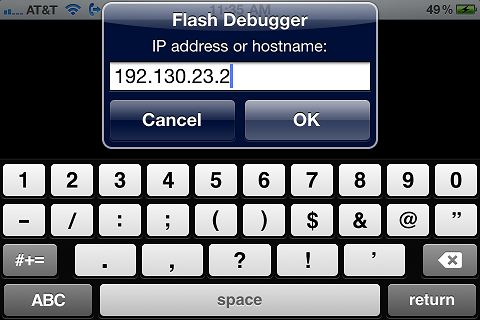
Step 6. Launch the application on your iPad or iPhone. You should get a popup window titled Flash Debugger that asks for the IP address or hostname.  Important:  your iPad or iPhone and your development machine need to be on the same wireless LAN, if they aren’t then this step won’t work. If you don’t have a wireless LAN handy you can always log both machines into a MiFi or some other type of mobile hotspot. Then enter the IP address of your development machine. On a windows machine you can easily get that in a DOS prompt using the command ipconfig. Hit OK.

The Final Result. If all goes well the app will launch and you will start to see debugging output in FlashBuilder.

Using FlashBuilder and Ant to Build SWCs with ASDoc Comments (on Windows 7)

It’s always an adventure when you try to use Ant to include your ASDoc comments into an Adobe Flex SWC library. I am completely baffled that Adobe can’t make this an automated step in Flash Builder, because it typically takes a alot of time to make things work correctly the “manual” way. So, I’m adding this blog post to the many already out there in hopes that my work can also help someone else.

I started off with a script that used to work on my old 32-bit laptop, but my new laptop is 64-bit. I kept getting Java Heap errors and I tried everything under the sun including changing FlashBuilder.ini and jvm.config to bump up the max heap size (-Xmx1024m). Nothing would work. What finally fixed this was adding the following line in my compc and asdoc sections of my build.xml file. If I made my settings any larger Flash Builder would throw an error. At some point I want to know why that is:

<jvmarg value="-Xmx1024m"/>

Here’s a few other tips-n-tricks:

  1. A lot of the blog posts I read were written for Mac’s…which I don’t have, so all the directory slashes were going the wrong direction.
  2. You need to install the Ant tools into FlashBuilder first. To do that go to Help > Install New Software and use this link: https://download.eclipse.org/releases/galileo
  3. When that loads its packages, look under Programming Languages for the option called Eclipse Development Tools and install that.
  4. Create a new Flex Library Project and drop in the actionscript class you want to convert.
  5. Create a file called build.xml and place it in the root directory of your project.
  6. Right click on the build.xml file and choose Run As > Ant Build.
  7. If you have errors, use echo statements to try and find out what’s going on.
  8. You absolutely must have a <taskdef> reference that points to flexTasks.jar.
  9. I also needed to include another class library into the build. You can see how I did that under the asdoc section using this pattern:
<compiler.source-path path-element="${basedir}\src"/>
<arg value="-external-library-path=${basedir}\bin\agslib-2.2-2010-12-08.swc"/>

References:

Adobe – Use the ASDoc Tool
Gaurev’s Blog – Creating Swc Files with ASDoc Comments


<?xml version="1.0"?>
<project name="mapsaverlib-1.0" default="main" basedir=".">

	<property name="FLEX_HOME" value="C:\Program Files (x86)\Adobe\Adobe Flash Builder 4\sdks\4.0.0"/>
	<taskdef resource="flexTasks.tasks"
		classpath="C:\Program Files (x86)\Adobe\Adobe Flash Builder 4\sdks\4.0.0\ant\lib\flexTasks.jar" />

	<echo message="Flex Home ${FLEX_HOME} "/>

	<!--<target name="main" depends="clean, compile, doc" description="Clean build of <filename>.swc">-->
	<target name="main" depends="compile, doc" description="Clean build of mapserverlib-1.0.swc" />

	<echo message="clean"/>

	<target name="clean" depends="clean-temp-docs">
		<delete failonerror="false">
			<fileset dir="${basedir}\bin">
				<include name="${ant.project.name}.swc"/>
			</fileset>
		</delete>
	</target>

	<target name="compile" depends="" description="Compile SWC">

		<echo message="Compiling ${ant.project.name}.swc"/>

		<compc fork="true" output="${basedir}\bin\${ant.project.name}.swc">
		    <source-path path-element="${basedir}\src"/>
		    <include-sources dir="${basedir}\src" includes="**\*.as **\*.mxml"/>
			<compiler.include-libraries dir="${basedir}\bin\" append="true">
				<include name="agslib-2.2-2010-12-08.swc" />
			</compiler.include-libraries>
			<jvmarg value="-Xmx1024m"/>
		</compc>

	</target>

	<target name="doc" depends="clean-temp-docs, compile"
		description="Updates SWC with ASDoc XML">
		<echo message="Compiling ASDoc for ${ant.project.name}.swc"/>

		<!-- Call asdoc to generate dita xml files -->
		<asdoc output="${basedir}\tempDoc" lenient="true"
			failonerror="true" keep-xml="true" skip-xsl="true" fork="true">
		    <compiler.source-path path-element="${basedir}\src"/>
			<arg value="-external-library-path=${basedir}\bin\agslib-2.2-2010-12-08.swc"/>
			<doc-sources path-element="${basedir}\src"/>
			<jvmarg value="-Xmx1024m"/>
		</asdoc>

		<!-- updates swc with asdoc xml -->
		<zip destfile="${basedir}\bin\${ant.project.name}.swc" update="true">
		    <zipfileset dir="${basedir}\tempDoc\tempdita" prefix="docs">
			    <include name="*.*"/>
				<exclude name="ASDoc_Config.xml"/>
				<exclude name="overviews.xml"/>
		    </zipfileset>
		</zip>
	</target>

	<target name="clean-temp-docs">
		<delete dir="${basedir}\tempDoc" failonerror="false" includeEmptyDirs="true"/>
	</target>

</project>