In part 1, we looked at the six types of location data available through the Android native SDK and talked about how to work with cached location data. As others have also discovered, there is a ton of information to say on this topic and way more than you could pile into a single blog post. So, this post focuses on working with real-time locations. Once you activate the location listeners they will start sending you information and knowing how to handle that data is what this post is about.
The most important take away I hope to leave you with is take time to understand your accuracy requirements and your user’s basic geographic behavior patterns. I’ve tried to liberally sprinkle example use cases to help illustrate some of the concepts.
Time and distance properties. The first thing you’ll notice when you start building location aware Android apps is you can set time and distance properties that affect how often the device will request a location update. This is accomplished using the overloaded LocationManager.requestLocationUpdates() method. These properties adjust how aggressively the device will request location updates by minimum time elapsed and minimum distance traveled. How you adjust these settings significantly affects the battery life. The equation for battery life is straightforward and simple: the shorter the minimum time interval the faster the battery will be drained.
In the code snippet below, the time and distance properties are both set to zero, which is the most aggressive setting. You’ll get a location update if any change in location is detected at any time. This setting can result in your app accessing the GPS provider as often as 50 – 60 times or more per minute.
locationManager.requestLocationUpdates(LocationManager.GPS_PROVIDER,0,0,listener);
I’ve experimented with this setting by leaving it running, and it drained a fully charge Samsung Galaxy SIII in less than 3 hours. The phone also got very hot to the touch. It takes considerable power to run the current generation of GPS chips. Even using network location requires that the phone use its radio to make an internet request to the location processing server. So, carefully evaluate your use cases and be conservative about the time and distance properties that are needed.
Except for high performance situations, it will be rare when you need location access every second at a zero distance delta. You can also adjust these properties if your app detects a change in the usage pattern. For example, if the user slows down for a period of time then you might restart the listener using a longer time interval. The listener does not have to stay static and be set only once. Hopefully this is your “ah-hah!” moment. In fact I encourage you to make dynamic adjustments to the intervals as your usage scenarios change. The GPSTester tool allows you to easily experiment with different configurations.
Here are some use case examples:
- Real-time tracking app for use when walking, running, biking or driving. As expected, this app will require the most aggressive settings for time and distance.
- Delivery vehicle tracking app. The delivery vehicle will be starting and stopping all day long. Minimal ability to plug phone into charger. This app should dynamically adjust its time and distance settings.
- App only needs a one-time snapshot location to find nearby coffee shops. This requires that the app run until a minimum accuracy value is received and then it can turn off the location listeners. Other examples are placing a geotagging a photo, tweet or Facebook posting. You could also try your luck using the overloaded Location.requestSingleUpdate() method.
And, here’s a very basic set of technical requirements for dynamically changing requestLocationUpdates() settings:
- Start application using minTime = 0 and minDistance = 0. Use an aggressive setting to get accurate location as quickly as possible.
- Once accuracy is less than 50 meters and speed less than 45 mph set minTime = 5000 and minDistance = 25.
- Speed equals 0 for greater than 1 hour. Shut off location listeners and notify user.
- Battery gets low. Shut off location listeners and notify user.
Time to 1st real-time location. It can take up to several minutes to get the first GPS or Network location result. Use effective notifications to let your users know there will be a delay in getting this information. For example, many Android mapping apps use an accuracy circle around the current location indicator to give a sense of accuracy level. 
As you can see in the GPS Provider screenshot taken from the GPS Tester app, using a warm GPS it took ~9 secs to get the first GPS result from the device and then 1450ms to get the next update for an accuracy of 3.0 meters. By warm I’m referring to a device where the GPS and Network location have been accessed recently.
How long it takes to start getting accurate results depends on many different factors of which you, as the developer, will have very little control over but you’ll need to plan for accordingly. As discussed in Part 1, many developers lean heavily on the cached locations to try and work around these types of delays. Yet, depending on your use cases and the end user personas these results can either be very useful or fantastically inaccurate.
According to Google user interface responsiveness guidelines 100 to 200 milliseconds is where users will start to perceive slowness and we are talking about 9 whole seconds here that the user had to wait. Of course 9 seconds is “fast” for a GPS acquisition. And, you can typically expect much longer time frames, especially on a cold device, and until the accuracy drops down to within a few hundred meters or less.
I’ve seen differences in acquisition times between two phones of the same exact model and same settings even though they were placed right next to each other. Other factors that affect acquisition times can be as simple as where you placed the phone in the car such as down by the gear shift between the seats or up on the dashboard. Or the user could be standing just inside a restaurant under a metal awning because it’s raining outside. The list goes on and on. Cement, bricks, metal, car bodies, heavy foliage and buildings are some other examples of things that can interfere with GPS signal accuracy and the time to first acquisition. Like the Boy Scouts say, “Be Prepared” and be kind to your users by using user interface notifications to let them know of location acquisition delays.
Streaming real-time locations. Once the device starts providing real-time locations, my suggestion is to check the accuracy of each result and consider rejecting those greater than a certain amount that are based on your requirements. The longer the location provider runs, and if the device has an unobstructed views of the sky and good cellular connection, then typically the accuracy will improve up to a certain point and then level off, and then it will fluctuate. Here’s a pseudo-code snippet showing how to check the accuracy of each GPS location result:
public void onLocationChanged(Location location) {
     if(location.getAccuracy() < 100.0 && location.getSpeed() < 6.95){
          //Do something
     }
     else{
          //Continue listening for a more accurate location
     }
}
Here are some rough examples of accuracy thresholds I used for a project last year. Your requirements may vary as to how these different thresholds will affect the behavior of your application; these were examples that required geocoding that converted the current location to an approximate address. Depending on the result the application gave different feedback to the user:
- Rooftop <= 10 meters (desired result)
- Street >10 meters and <= 100 meters (let user know it’s close but not perfect. Good enough?)
- Neighborhood > 100 meters and <= 500 meters (give visual feedback that accuracy is low)
- City > 500 meters and <= 2000 meters (ask user to verify city name from a list)
- County > 2000 meters (prompt for manual location input)
Take into account your own unique use cases. You might completely reject any accuracy value greater than 100 meters (328 ft) if your app simply helps people find open parking lots at NFL games. You could have an app that returns a list of Dentist offices within a 5 mile (8000m) radius. Or a weather app could only need to know approximately what city you are in. These are just ideas to help get you thinking.
Not all real-time location data is alike. Continuing on the theme of consuming real-time location, let’s dig into a few more examples of why it should be looked at closely. Here’s one thing that I keep forgetting even though I’ve blogged about it: you can get null location values and if not properly handled they will crash the app. That’s an easy one to forget until your users start to report random application crashes.
You can also look for what I’ll call spurious results. These are results that are way outside what you might consider a running average. Check the distance between the last location result and the current location result using the Location.distanceBetween() method. If the distance and speed required to cover that distance is significantly greater than the running average, then you can reject that result.
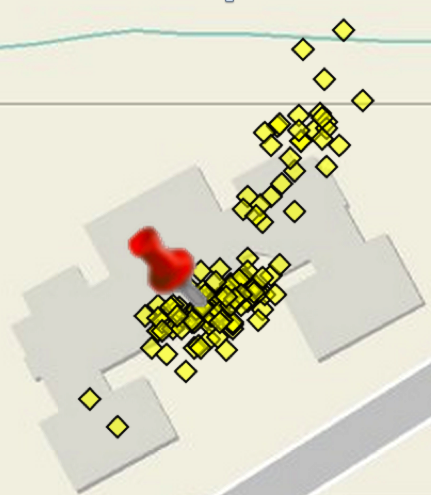
I also want to mention that simply holding the device in one location while standing outdoors can result in the latitude/longitude wandering over a reasonable distance. Even if you set the phone on a rock the results can wander. Just keep this in mind if you have accuracy requirements. Just because the user is standing still outdoors doesn’t mean that the indicated location will stay exactly the same. It could wander over a 10 to 50 meter radius or more.
I have occasionally seen wild location fluctuations that were enough to make a mapping application nauseatingly jump back and forth between different center points. Unfortunately, when it happened I didn’t have the device on a debugger, but I suspect it had to do with the phone detecting various WiFi end points when I stopped at stoplights along my route. It’s possible the phone tried to resolve those WiFi locations using the Google Network Location service and that there was some lag time in processing those results.
Are Android, off-the-shelf, retail smartphones as accurate as something like a Trimble Pro Series Receiver? No way, not all, definitely not! If you have high accuracy, field-usage requirements calling for sub-meter results you should not be using a typical retail Android device. For example, if you are standing in an intersection with four manhole covers that are two feet apart and form a circle, you could not accurately map which manhole cover is the right one that you need to be working in if you are using an off-the-shelf Android. Using my own phone as an example, on a good day my Samsung Galaxy SIII occasionally has down to 3 meters GPS accuracy for short periods of time and then it can start wandering.
Comparing Network and GPS locations and using Criteria. Yes, you should definitely compare the results between these two. The more data you have the better. There’s not a whole lot to say about this other than look at timestamps, accuracy and distance traveled factors. In my experience, just something to keep in mind is the network locations happen much slower than the GPS. I expected this because of the lag time involved with the phone sending information to the remote location service and then waiting for a result to come back. You can read more about how location services work in this article.
The use of android.location.Criteria can also be used to control which listener(s) are used. You can experiment with Criteria using the GPSTester tool. The only minor caveat is it doesn’t include all possible criteria in the current version (v1.2.1.1). My general recommendation is to skip Criteria and hard code in the validation rules. I don’t currently subscribe to the idea that the Criteria will know what’s best for my end users. Please comment below if you feel otherwise, but in my own experience I haven’t come across a use case where Criteria gave what I thought was the right answer. In one use case, the Criteria was set to not incur costs, yet the value returned was to use the network provider even though GPS was available. Using the network location service would have incurred bandwidth costs.
What to do when app is minimized? A common workflow is for a user to minimize the app and then either forget about it or come back to it later. I’ve included this because it’s common for the user to get a phone call or a text message that results in the app being minimized. In most of the use cases I work with, the requirements call for both the GPS and Network Location services to be shut off when the app is minimized. It’s just way too easy for the user to forget about the app and then it could kill the battery in a very short time.
There is the option of using a passive listener. I rarely use these because it assumes some other unknown application will spin up the GPS or Network Location providers. Your use cases will help you decide whether or not implementing a passive listener is a good idea. If your target audience is a 20-something student who is constantly using location based social media such as Facebook every hour and eighteen hours a day then there’s a good chance the passive listener will return recent and mostly accurate results. However, if you are building a commercial-grade application on a work-related phone then a passive listener is significantly less likely, or even highly unlikely, to speed up the applications ability to get a fast fix on startup.
Use Intents when implementing a passive listener, this involves adding directives in the AndroidManifest.xml as well as writing some code. A great example of how to do this can be found here, so I’m not going to reinvent the wheel. Just don’t forget to add the receiver tag to your manifest:
<receiver android:name=".receivers.PassiveLocationChangeReceiver"/>
When the app restarts you can use information from the passive listener and consider whether or not it meets your accuracy criteria. You can also use the passive listener to run background processes within your app while it is minimized. You’ll use the Location timestamp once the app is opened again. If the timestamp is very recent, such as less than one hour old, then you could consider using the passive location immediately. Otherwise, you’ll be back to waiting for a real-time location result. For this approach consider comparing Location.getRealtimeNanos() to SystemClock.elapsedRealtimeNanos(). If your target audience are business travelers, then for example you might want to reject cached results that are greater than 8 hours old because chances are the user has hopped on a plane.
Privacy, data storage and data consumption. Yeh, it’s a bummer I even had to bring this up. I’m not a lawyer, but every lawyer I’ve worked with on these types of production applications strongly reminds me to have a Privacy Policy and to be transparent about how the data is stored and how the data is used. Don’t try to do this on your own, hire a lawyer or the equivalent of a lawyer in your country, as the case law is constantly changing and can vary from State-to-State and Country-to-Country.
And, that’s the wrap-up for Part 2. Stay tuned for additional posts on this series that cover using the GPSTester tool and how to interpret the results.
References
Google Developer docs – Location Strategies
Android blog – Deep dive into location
GPS Testing Tool (open source)
HTML5 Geolocation API – How accurate is it, really?